Pages

Showing posts with label Instructional Article. Show all posts

Friday, April 28, 2023

"Oil Changes for Dummies"- Dev S


For many combustion engine car owners, getting an oil change is a routine maintenance task, typically costing between $80 and $100 at a shop that often pushes customers to perform additional basic maintenance. This guide will demonstrate how easy changing your own oil can be, as well as how much money you can save by taking on this task yourself.


To get started, you'll need to make an initial investment in some necessary tools. Although this may seem expensive at first, it will ultimately save you money in the long run and eliminate the need for multiple trips to places like Jiffy Lube or Pep Boys.


These items include: 

Oil Drain Pan

Ratchet and necessary sockets
Oil Filter Wrench

Special Socket (European Cars and Foreign Cars only)

Dirty/Used Rags

Car Ramps (Low Clearance cars only)

Fast Orange Soap

Large Cardboard sheet or undercarriage cart

New Oil

New Oil Filter

Funnel


To begin, it's important to circulate the oil in your car by starting it and occasionally stepping on the gas while in park. If you have a sedan, slowly drive it onto ramps to lift the front side and make the undercarriage accessible.


 Before proceeding, allow the oil to cool down for a few minutes. Then, open the hood and locate the oil fill cap marked with an oil can dripping oil. Twist it open and leave it to the side. If there's an oil dipstick present, slightly pull it and leave it open to allow air to flow through. These steps enable air to circulate through the top and push all the oil from the bottom, ensuring a steady flow.


 Next, look up the make and model of your car to find the location of the oil pan underneath it. Locate the oil drain plug and get the appropriate socket and wrench to “break” the bolt. Breaking the bolt means to open it so that you can unscrew the rest of it by hand. Finally, place an oil drain pan underneath the bolt to catch the oil when it comes out, preventing spills.


To avoid getting hot oil on your hands or making a mess, once the bolt starts to come loose, push it into the oil drain pan and unscrew the last thread. Then, quickly move out of the way and remove the bolt.


 During the time the oil is draining, locate the oil filter. For example, most Toyotas and Hondas have oil filters that are accessible from the bottom, while European cars and some Subarus have top-side oil filters that are easier to change.


After the oil has fully drained and the stream slows to a trickle, it's time to install the new oil filter. Begin by placing the bolt and new washer into the oil drain pan and tightening it to factory specifications. If you don't own a torque wrench, use your best judgment to ensure it's tight but not overly so, as to avoid warping any metal or plastic components of the oil drain pan.


Next, locate the oil filter and use a wrench to loosen it. Once the filter is "broken" loose, place a large plastic cup that fits over the filter and unscrew it the rest of the way, taking care to catch any dripping oil in the oil drain pan below. Remove the old filter and clean it with an old rag, then place it in the box that the new filter comes in for easy disposal. 


There are two types of oil filters - spin on and cartridge. While spin on filters require minimal preparation, cartridge filters need some extra work.


For a spin on filter, apply some oil from the drain pan onto your finger and rub it on the seal on the outer edge of the filter. Then, screw on the filter using the special oil filter wrench until it is tight. 


For a cartridge filter, remove the old cartridge from the housing, thoroughly clean the entire housing with rags, remove the two old seals, and replace them with new ones. Apply some oil onto the new seals and place the new cartridge inside the housing. Then screw back on and tighten using a wrench. 


It is crucial to check how many quarts of oil your car requires, as adding too much or too little can cause damage. Using a funnel, fill the new oil into the oil fill area until you reach the desired quantity. Close the oil fill cap and double-check that the filter, drain plug, and oil fill cap are tightened properly.


Make sure to clean up any oil spills on the ground or any other parts of the car using a rag.


Start the car and let it idle for a few minutes before driving to ensure the oil has circulated through the entire engine.


Remove the dipstick completely, wipe it clean, push it all the way back in, and remove it again to check the oil quantity.


Next, pour all the old oil from the drain pan back into the new oil bottles that are empty and make sure to close them tightly.


Finally, take all the used oil and the old oil filter to an auto parts shop such as AutoZone to properly recycle everything.


Oil Changes for Dummies - Dev Singh 


Well done, you have completed a basic maintenance task and saved yourself a significant amount of money. Remember to take note of your current mileage and set a reminder to change your oil again after 5000 miles for conventional oil or 10,000 miles for synthetic oil.


Last Step is to wash your oily hands because chances are you spilled. Use Fast Orange soap to thoroughly scrub the oil from your skin. Then use normal antibacterial hand soap one more time to ensure your hands are clean. 


"How To Make Cheesecake Cupcakes" by Jizelle H


I’ve always loved eating cheesecake, but I was only ever able to eat it for special occasions because it is harder to make than a regular cake. My mom found the solution to this a few years ago when she discovered an easy recipe for cheesecake made to be the size of a cupcake. Ever since she learned this recipe she makes it when we have family gatherings, and she’s taught me how to make them too. These cheesecake cupcakes always bring me happy memories of spending time with my family, and I hope that you can enjoy this recipe as well!


To start off with, you will need to make sure you bake these the night before you want to eat them since they need to be refrigerated overnight. This recipe will make about 12 cheesecake cupcakes. Prep time will take about 20 minutes and bake time is 15 minutes.


To begin baking you need will need the following materials


      Whisk

      Spoon

      Mixer

      Ice cream scoop

      2 bowls (a big and small one)

      Measuring cups and spoons

      Rolling pin or food processor

      Plastic bag (only for rolling pin)

      Cupcake tray (12 cup)

      Cupcake liners


All ingredients must be at room temperature in order to make mixing easier. For the two main parts to this recipe, the biscuit base and the cheese filling, the ingredients are the following


Biscuit Base Ingredients

      1 ½ cup crushed biscuits

      ¼ cup unsalted butter


Cheese Filling Ingredients

      10.5 oz full fat cream cheese

      ¼ cup granulated sugar

      2 eggs

      1 teaspoon vanilla extract

      1 tablespoon lemon juice

      1 ½ tablespoon all purpose flour

      ¾ cup full fat sour cream


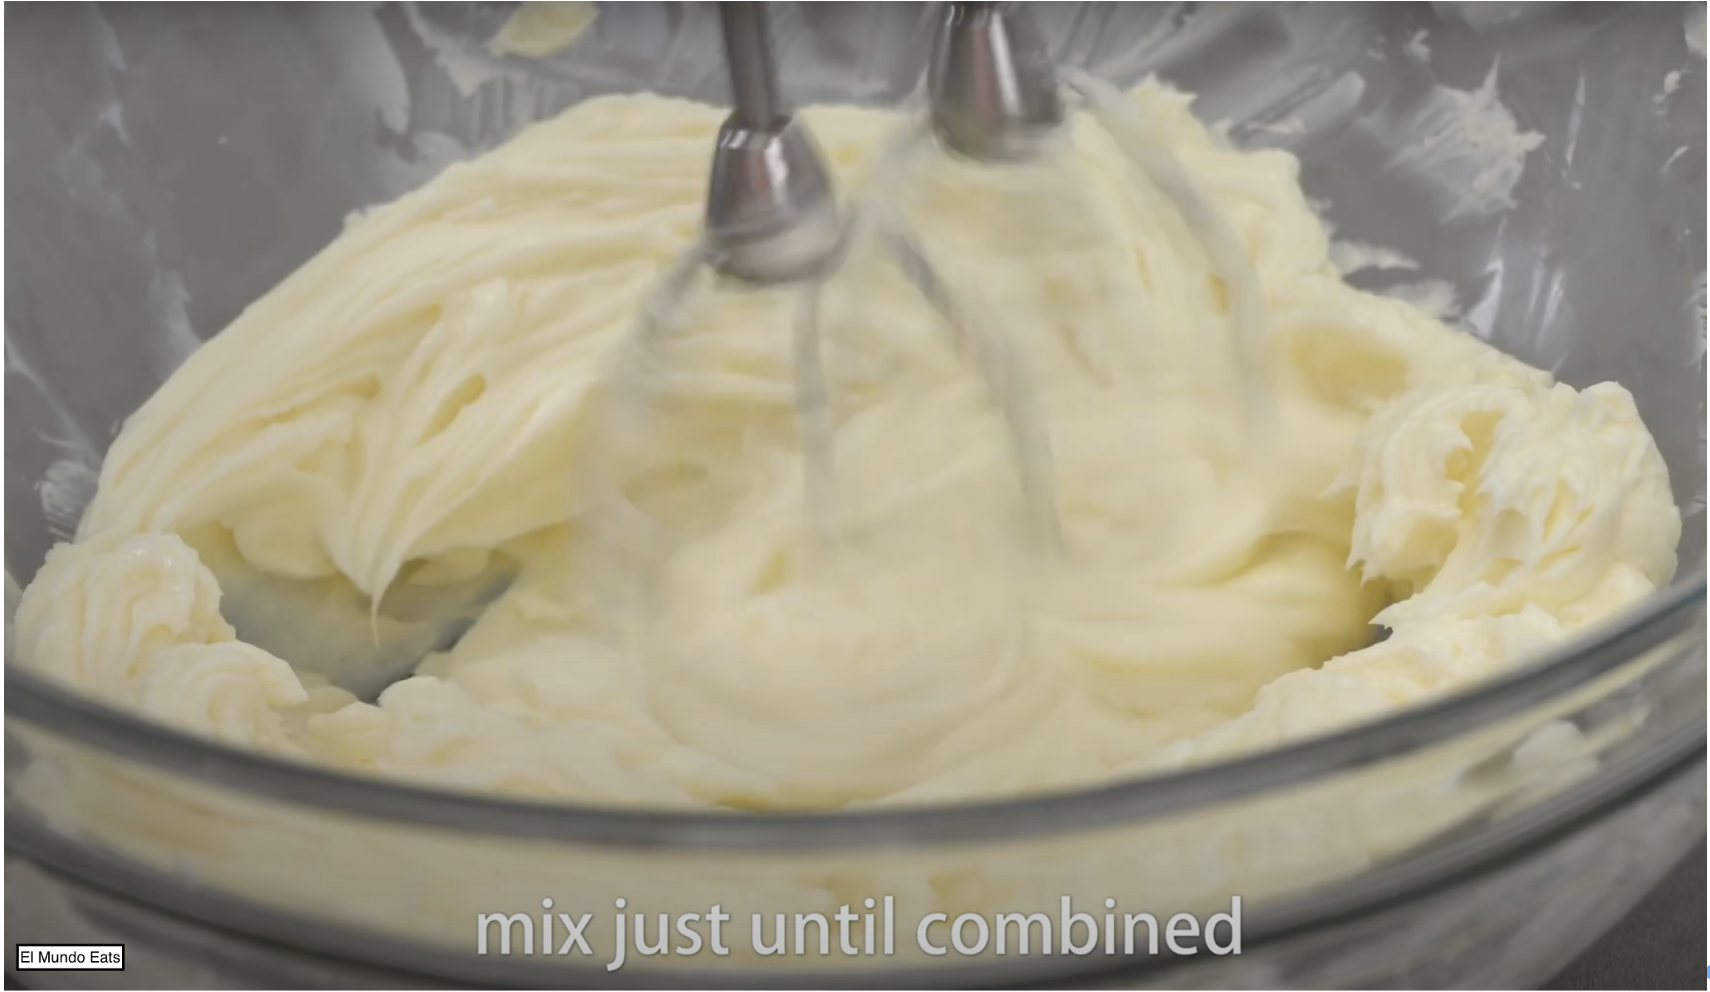
*Following photos credited to El Mundo Eats Youtube channel/trustedreviews.com


Step 1: Place your choice of biscuits into a plastic bag, it will hold the crushed biscuits so it won’t make a mess. Using a rolling pin, crush the biscuits until it is a fine mixture. You can also just use a food processor if you have one!


Step 2: Place 1 ½ cup of the crushed biscuits into a small bowl and mix with ¼ cup of butter. This is to make the biscuit crumbs stick together so they don’t crumble. This makes for a better cheesecake base.


Step 3: Place a small amount into each cupcake liner and place in the tray. Then, using a spoon, press on the biscuit crumbs tightly and evenly into the tray so that the cheese filling can be poured on top. Then set it aside.


Step 4: Place 10.5 oz of block cream cheese in a big bowl then whisk using a mixer. Whisk until it is creamy. Make sure to use a low speed so you don’t overmix.


Step 5: Mix in ¼ cup of sugar little by little. This is done to get a better mixture.


Step 6: Next add in your eggs one at a time. Again, this is done in order to get a better mix. Mix until it is just combined.


Step 7: Using the measuring spoons to get the right amount, pour 1 teaspoon vanilla extract into the mixture. This will take the edge off the smell of raw eggs. Then pour 1 ½ tablespoon of all purpose flour. This will prevent cracks in the cheesecake cupcakes. Finally add 1 tablespoon lemon juice to give a hint of citrus that will balance flavor. Then mix just to combine.


Step 8: Add in 6.5 oz of sour cream and mix. The sour cream actually softens the texture of the cream cheese while adding a tangy flavor.


Step 9: After mixing, use an ice cream scoop to scoop the filling and place it onto every previously prepared base.


Step 10: Gently shake the cupcake tray. This will cause the filling to spread out more evenly and make the top surface flat.


Step 11: Bake for 15 minutes at 320℉ in an oven that has been preheated. Make sure that if it's not a conventional oven that it’s on conventional mode so that the temperature will be stable-low. This is done so that the cheesecake will not overbake and crack.


Step 12: Remove the cheesecake cupcakes from the oven and let them cool down to room temperature. Then place in the fridge. Cooling to room temperature will allow them to set completely. Putting the cheesecake cupcakes in the fridge while still hot can spoil them.


Step 13: Serve! You can serve them as they are or add some toppings. I recommend adding a little strawberry jam and your choice of berries.


After reading I hope that you will want to make these and enjoy them!

"How told Hold Different Styles of 4 Mallets" - By Nicolas A P


Marimba, Vibraphone and Xylophone are examples of mallet type percussion instruments used in a concert or orchestra setting but are also used for marching bands. They are large instruments that have the same layout as a piano but with big wooden keys for marimba and xylo keyboards or with metal keys for vibraphone keyboards. 4 mallets is a technique where you hold two mallets in one hand so players can play chords on the keyboard and generate large sound and create harmonies when played with multiple people. I will be explaining the ways one how to hole two different grips, Stevens grip which is the most common and the easiest and traditional grip which is a little more challenging but fun to use when playing chords.

Tools: Only tools you need are a pair of mallets to hold in one hand or two pairs to hold two mallets in each hand.

Stevens Grip

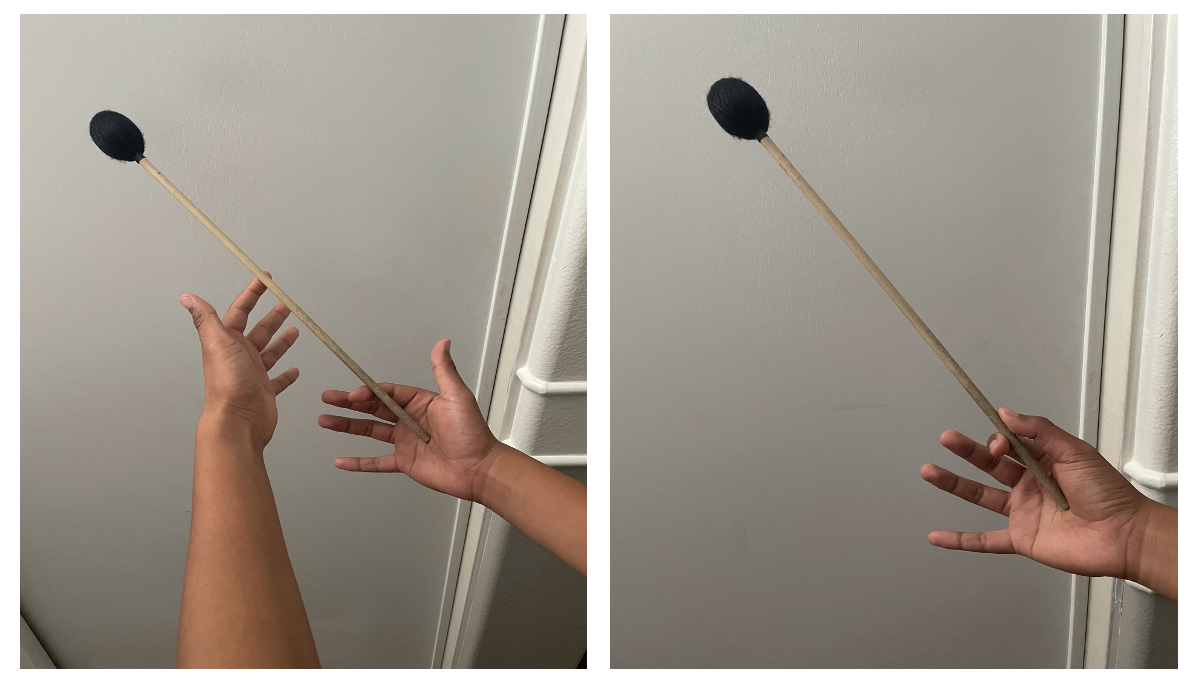
1)Place the bottom of the mallet in the center of your palm, this will become the foundation of where to put the 2nd, or outside mallet and is the base for where the 1st, or inside mallet is. There are many types of grip but this grip is called Steven’s grip.


2)Next relax your index finger and your thumb letting the mallet fall into the first indent on your index finger and just simply placing your thumb on top of the mallet to gain control of the mallet.


3) The last part is to add the outside mallet. This mallet will be placed in between your middle and ring finger and will be held by your ring and pinky finger. You want to make sure that there is not a lot of slack hanging off from the outside mallet or else it will cause insufficient playing and bad technique and could result in some pain from holding the mallet wrong and using the wrong muscles and result to injury (this has happened to me before it is not fun). You want to make sure there is only about a third of an inch of slack left and have it rest on the fatty part of your hand. After, place your middle finger on the inside mallet where it will hold it for more control and the result in a normal state should look like a pizza shape and that is how you know you are holding the mallets right. After that you are now holding the 4 mallet grip called Stevens grip. It is a good beginner technique and mainly used in west-coast type playing in the marching band aspect which is more flowy and has more use of the arm.


Traditional Grip

1) Place the mallets in a cross form on a table, bed, or on your keyboard. Simply just grab the mallets with your ring and pinky finger at the intersection of the mallets. Make sure the mallets  are still crossed or else the grip won’t work. 


2) The last thing is to place your middle finger on the outside mallet this time to control and make sure it doesn’t fly everywhere. Then place your index and thumb in the intersection of the mallets and hold it as if your fingers are making a “claw”. Traditional grip is one of the oldest types of grips and mainly used for east coast type marching style since it is better for playing octaves and playing loud and good for using the wrist “knocking” type of motion which is the normal technique for playing chords on the keyboard but west coast uses more arm while east coast uses more wrist and traditional grip is good for that. 


Last Step)

The last step for both of these techniques is to just practice practice practice. It takes a while to get used to these techniques and doesn’t happen right off the bat. Just make sure you hold the mallets with the right technique and you will eventually build muscles to hold heavier mallets. In the process of playing with these grips and with heavier mallets, you will start to blister in spots such as the center of your palm and your middle finger. Those are the normal spots to blister and it is normal and is just your hand building up calluses to build endurance holding mallets so your hands won’t get tired as fast. If you get blisters anywhere else such as the pinky, ring finger or thumb or feel sharp pain anywhere on your hand, you may want to look at how you are holding the mallets because those types of causes are from holding the mallets wrong, but if you continue practicing even just 15 minutes a day, you will eventually build the stamina in your hands and grow better as a player and play cool music on your own on either marimba, vibraphone, xylophone or any other mallet instrument.

Friday, March 24, 2023

“How to Make Vegan Fried Fish” - Isis Price-El


My Nanny had a favorite recipe that her grandmother made for her on special occasions when she was a child. Her grandmother lived in the South in the late 1800s. You could only imagine how that would’ve felt for black women. Despite her limited resources, low wages, and the odds being against her, she was able to create a special recipe for my Nanny. She had made this fried fish recipe for my Nanny only once in a while. The recipe has evolved, as it has been passed down through generations. When my Nanny's mother passed away when she was 16 years old, she decided to make several life changes, including becoming a vegetarian. My mother was raised a vegetarian, and her children are third-generation vegetarians. Being a vegetarian or vegan used to be more difficult, but there are now so many options and creative ways to explore plant-based foods. There are numerous heavily processed options available for vegan foods, but my family has had great success working with more plant-based ingredients. So, here’s a vegan version of a traditional southern fish recipe passed down from my great-great-grandmother.


Prep Time= 10 min

Cook Time= Around 30 minutes


Dry Ingredients:

2 teaspoon Black Pepper

2 tablespoons Garlic

1 teaspoon Smoked Paprika

1 tablespoon Old Bay

1 tablespoon Nutritional Yeast                                                                                             

2 tablespoons Cayenne Pepper

1 teaspoon Cumin

3 Tablespoons Nori Flakes

½ Cup Fish Fry

¼ Cup Hemp Seeds


Wet Ingredients:

1 tablespoon Mustard

1 Can Heart Of Palm

½ Cup Unsweetened Creamy Oat Milk

2 Tablespoon Sesame Oil

Vegetable Oil

Louisiana Hot Sauce (Optional) < I would recommend it though :)


Prep


Step 1: Start by draining the can of the hearts of the palm. Then continue to slice them in half. (I like to make the pieces smaller so they are easier to coat later on). Poke holes into the pieces of the heart of palm. Place a fork in the middle and drag down to slightly shred them. Be sure not to place the fork too deep. This helps them get volume and texture! So you can enjoy that flaky consistency!


 Step 2: Season the hearts of palm with nori flakes and sesame oil. This step is to give the hearts of palm that “fish” flavor. I would recommend adding more nori to taste the flavor through the dry batter. (Let marinate for rest of prep time)


Step 3: In a medium bowl, mix milk, mustard, and hot sauce to taste. Mix until bubbles start to form. Try to stir slowly to be sure the mustard blends properly. (Place the wet mix into the refrigerator until later use)


Step 4: Mix all of the dry ingredients together to make the dry batter. Mix until the seasoning disappears within the fish fry. The seasonings are just the basic measurements, I prefer seasoning to taste. (If you like your fish crispy add more hemp seeds for extra crunch and protein)


Step 5: Place wok on the stove and pour a good amount of vegetable oil. The best way to check if the oil is hot is using a chopstick/wooden stick, if bubbles form around the chopstick the oil is ready. (A wok is a chinese frying pan that resembles a bowl. I recommend using a pot or pan that is similar to a wok because it makes the frying easier and safer)


Step 6: Dip the hearts of palm in the dry mix then the wet mix. Be sure to do this process slowly. Coat the hearts of palm very well and be very generous with the dry mix. (For a extra crunch repeat the process twice)


Step 7: Place in oil and fry until crispy. Remember, place the “fish” in at a low level so the oil wont splash back and harm you. Work in batches so the pan isn't too full and to cook more efficiently. After cooking, let them cool for around 2 minutes. Then serve


Step 8: Force your brother to take photos holding the food you prepared :)

(Be sure to have someone try your version of the recipe and add your own toppings. My favorites to add are lemon and hot sauce)


I hope this inspires you all to incorporate more vegetables into your diet and test out some vegan recipes. They are not only super interesting but also very tasty as well. Becoming more conscious of what you consume will change your life. As my Nanny would say “Eat to live, don't live to eat!”