Pages

Friday, April 28, 2023

Our last group of writers !


 All Students:  Be sure to read the entries for this group --April writers).  Everyone is required to comment on at least THREE different pieces of writing.  You must submit comments on Canvas (for each one, include the name of the author and the title of their piece, and then your positive, specific comment ) by Friday, May 12 on Canvas.


Remember, comments must be positive, supportive, constructive, and SPECIFIC.  No "Good Job!" comments, unless you follow that with specific things you thought were done well in the piece.  Show them you actually took the time to read and enjoy their work!

"Big Fly" by Riccardo G


As the sun began to set on the field, I stepped up to the plate with the bat in my hands. The stands were silent as I had just recovered from injury and nobody in the stands, not even my parents, expected anything to happen. I didn’t even think anything was going to happen, since I just came back from injury. However, I took a deep breath and focused my attention on the pitcher’s hand, ready to analyze the ball’s spin and just put the bat on the ball. With one swift movement, the bum on the mound released the ball, and I recognized the spin watching the grip and the laces. It was a heater about chest high and on the inner part of the plate. I swung my bat as hard as I could, in baseball they call that a daddy hack, and connected with the ball with a hit that echoed throughout the park. The parents erupted into cheers as the ball went soaring through the air, soaring towards the homeless man that wanders around behind the fences. As I realized that I actually hit the ball I went into a full sprint towards first base, each step propelling me closer and closer to the glory that I didn’t expect to achieve. The outfielder scrambled to reach for the ball, but it was too late. The ball had already doinked the homeless man in the head about a hundred feet past the fences, and I continued to sprint with excitement around the bases. The parents in the stands were uncontrollable. It was as if I had hit a home run, wait a minute, I did. Holy crap I hit a home run, as I’m sprinting around the bases I see my teammates flooding out of the dugout and my parents jumping for joy, and subsequently passing out and falling over, fun times. I was filled with a sense of pride and accomplishment, I had done something that I knew I could only do once, which was true I never hit another home run. As I crossed home plate, being dog piled and greeted by my teammates, I beamed with joy, When I was walking back to the dugout I knew that I could never do that again, which is why I keep that baseball in my room, forever to be treasured. Now as I look back upon this experience, I just wonder how much of this story was true.

"Oil Changes for Dummies"- Dev S


For many combustion engine car owners, getting an oil change is a routine maintenance task, typically costing between $80 and $100 at a shop that often pushes customers to perform additional basic maintenance. This guide will demonstrate how easy changing your own oil can be, as well as how much money you can save by taking on this task yourself.


To get started, you'll need to make an initial investment in some necessary tools. Although this may seem expensive at first, it will ultimately save you money in the long run and eliminate the need for multiple trips to places like Jiffy Lube or Pep Boys.


These items include: 

Oil Drain Pan

Ratchet and necessary sockets
Oil Filter Wrench

Special Socket (European Cars and Foreign Cars only)

Dirty/Used Rags

Car Ramps (Low Clearance cars only)

Fast Orange Soap

Large Cardboard sheet or undercarriage cart

New Oil

New Oil Filter

Funnel


To begin, it's important to circulate the oil in your car by starting it and occasionally stepping on the gas while in park. If you have a sedan, slowly drive it onto ramps to lift the front side and make the undercarriage accessible.


 Before proceeding, allow the oil to cool down for a few minutes. Then, open the hood and locate the oil fill cap marked with an oil can dripping oil. Twist it open and leave it to the side. If there's an oil dipstick present, slightly pull it and leave it open to allow air to flow through. These steps enable air to circulate through the top and push all the oil from the bottom, ensuring a steady flow.


 Next, look up the make and model of your car to find the location of the oil pan underneath it. Locate the oil drain plug and get the appropriate socket and wrench to “break” the bolt. Breaking the bolt means to open it so that you can unscrew the rest of it by hand. Finally, place an oil drain pan underneath the bolt to catch the oil when it comes out, preventing spills.


To avoid getting hot oil on your hands or making a mess, once the bolt starts to come loose, push it into the oil drain pan and unscrew the last thread. Then, quickly move out of the way and remove the bolt.


 During the time the oil is draining, locate the oil filter. For example, most Toyotas and Hondas have oil filters that are accessible from the bottom, while European cars and some Subarus have top-side oil filters that are easier to change.


After the oil has fully drained and the stream slows to a trickle, it's time to install the new oil filter. Begin by placing the bolt and new washer into the oil drain pan and tightening it to factory specifications. If you don't own a torque wrench, use your best judgment to ensure it's tight but not overly so, as to avoid warping any metal or plastic components of the oil drain pan.


Next, locate the oil filter and use a wrench to loosen it. Once the filter is "broken" loose, place a large plastic cup that fits over the filter and unscrew it the rest of the way, taking care to catch any dripping oil in the oil drain pan below. Remove the old filter and clean it with an old rag, then place it in the box that the new filter comes in for easy disposal. 


There are two types of oil filters - spin on and cartridge. While spin on filters require minimal preparation, cartridge filters need some extra work.


For a spin on filter, apply some oil from the drain pan onto your finger and rub it on the seal on the outer edge of the filter. Then, screw on the filter using the special oil filter wrench until it is tight. 


For a cartridge filter, remove the old cartridge from the housing, thoroughly clean the entire housing with rags, remove the two old seals, and replace them with new ones. Apply some oil onto the new seals and place the new cartridge inside the housing. Then screw back on and tighten using a wrench. 


It is crucial to check how many quarts of oil your car requires, as adding too much or too little can cause damage. Using a funnel, fill the new oil into the oil fill area until you reach the desired quantity. Close the oil fill cap and double-check that the filter, drain plug, and oil fill cap are tightened properly.


Make sure to clean up any oil spills on the ground or any other parts of the car using a rag.


Start the car and let it idle for a few minutes before driving to ensure the oil has circulated through the entire engine.


Remove the dipstick completely, wipe it clean, push it all the way back in, and remove it again to check the oil quantity.


Next, pour all the old oil from the drain pan back into the new oil bottles that are empty and make sure to close them tightly.


Finally, take all the used oil and the old oil filter to an auto parts shop such as AutoZone to properly recycle everything.


Oil Changes for Dummies - Dev Singh 


Well done, you have completed a basic maintenance task and saved yourself a significant amount of money. Remember to take note of your current mileage and set a reminder to change your oil again after 5000 miles for conventional oil or 10,000 miles for synthetic oil.


Last Step is to wash your oily hands because chances are you spilled. Use Fast Orange soap to thoroughly scrub the oil from your skin. Then use normal antibacterial hand soap one more time to ensure your hands are clean. 


"Ascension to Challenges " by Dilan A


In 2019, the World Health organization reported that around 2.2 billion people have blindness or vision impairment of some kind. Not many people are aware of this and even fewer people actually decide to take action to help these people. At the age of 15, I chose to make an impact, not only in the family business, but also on a greater scale with a nonprofit organization with a vision to aid those with vision impairment.


On several occasions during the early summer of 2020, I remember my mother coming home with teary eyes and smeared makeup. She was distraught with the current state of her optometry business. Many patients weren’t leaving their homes due to the COVID restrictions at the time. This led to a lack of patients coming into the office for appointments and a decrease in office sales. As the CEO, my mother was tasked with the challenge of finding new employees during the pandemic, but it seemed to be almost impossible to find anyone qualified to fill the role. Many people were inexperienced and gave up on the job rather quickly.


Seeing my mother in that state was truly painful, so I decided to work at her office during the summer. In addition to handling administrative tasks around the office, I started directly interacting with patients. I had to learn quickly what was involved in checking the patient’s prescription and pre-testing patients. I also used my knowledge and long-time interest in accounting and financial modeling; I soon took over running the company’s spreadsheets with our balance statement of profits and loss. I was responsible for sourcing designer frames as well and keeping a track of the office’s inventory. Each week, I carefully tracked our business metrics and set goals for inventory, sales and expenses.


Amidst the struggles during the summer, I noticed areas that could use improvement. I was logging the patient statistics into the computer and watched as my coworker tossed some of the plastic contact lens blister packs in the regular trash can. The office didn’t have a recycling bin and this made me reflect on how environmentally unconscious society is as a whole. The office dealt with lots of plastics and trash yet there was no recycling method implemented. Also, many of the patients I talked to were unable to afford glasses due to being unemployed or furloughed; they were frequently unable to access eye care or buy eyewear due to the lack of appointments during lockdown. For weeks, I had these types of interactions, and after a while, the frustrations of our patients and environmentally unconscious practices began to get to me. I decided that I needed to do something about it–just working in the optometry business to help my mother wasn’t enough.


Therefore, I decided to start a nonprofit organization called VISION4U, with the goal of making eyewear accessible to all and recycling contact lens blister packs. I incorporated it as a 501(c)3, which took me many long nights of filling out IRS tax forms and State Regulation Forms. Next, I reached out to a network of local optometry offices. I asked them for donations of used eyeglasses and contact lens blister packs for our cause, and many agreed. Afterwards, I reached out to other organizations–Lion’s Club and Terracycle, and secured partnerships to help with recycling and distribution. Lion’s Club helped to get hundreds of repurposed glasses out to people in the community who needed them urgently, while Terracycle helped me recycle thousands of contact lens blister packs. VISION4U is going strong today by being more productive and keeping a good relationship with our partners. I’m currently planning to develop a mobile app to facilitate the process of recycling and distributing the glasses, while providing tips on eye health and proper care through workshops and our instagram page. I firmly believe that access to vision care is a basic human right; seeing well is a fundamental part of living well, and I can’t wait to expand my efforts in college and beyond! I hope to continue my work on my college campus and secure more partnerships to help expand the nonprofit’s outreach efforts.


Creating this nonprofit has allowed me to adopt a mindset that focuses on being more environmentally sustainable. In the summer, I will be starting a clothing brand and plan on choosing manufacturers that are environmentally conscious. Although it may be more expensive, it is definitely worth it to establish my brand as one with high quality and consciousness for the environment. Go support it in the summer! @da.ascension


"How To Make Cheesecake Cupcakes" by Jizelle H


I’ve always loved eating cheesecake, but I was only ever able to eat it for special occasions because it is harder to make than a regular cake. My mom found the solution to this a few years ago when she discovered an easy recipe for cheesecake made to be the size of a cupcake. Ever since she learned this recipe she makes it when we have family gatherings, and she’s taught me how to make them too. These cheesecake cupcakes always bring me happy memories of spending time with my family, and I hope that you can enjoy this recipe as well!


To start off with, you will need to make sure you bake these the night before you want to eat them since they need to be refrigerated overnight. This recipe will make about 12 cheesecake cupcakes. Prep time will take about 20 minutes and bake time is 15 minutes.


To begin baking you need will need the following materials


      Whisk

      Spoon

      Mixer

      Ice cream scoop

      2 bowls (a big and small one)

      Measuring cups and spoons

      Rolling pin or food processor

      Plastic bag (only for rolling pin)

      Cupcake tray (12 cup)

      Cupcake liners


All ingredients must be at room temperature in order to make mixing easier. For the two main parts to this recipe, the biscuit base and the cheese filling, the ingredients are the following


Biscuit Base Ingredients

      1 ½ cup crushed biscuits

      ¼ cup unsalted butter


Cheese Filling Ingredients

      10.5 oz full fat cream cheese

      ¼ cup granulated sugar

      2 eggs

      1 teaspoon vanilla extract

      1 tablespoon lemon juice

      1 ½ tablespoon all purpose flour

      ¾ cup full fat sour cream


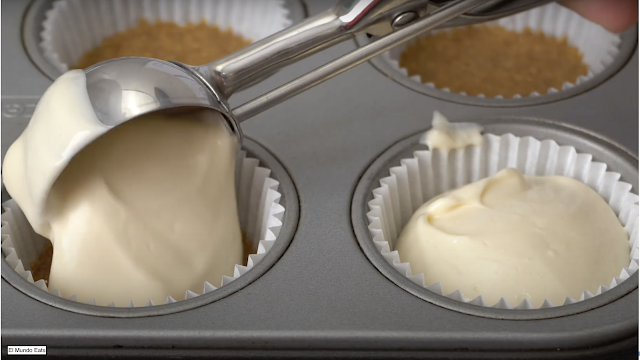
*Following photos credited to El Mundo Eats Youtube channel/trustedreviews.com


Step 1: Place your choice of biscuits into a plastic bag, it will hold the crushed biscuits so it won’t make a mess. Using a rolling pin, crush the biscuits until it is a fine mixture. You can also just use a food processor if you have one!


Step 2: Place 1 ½ cup of the crushed biscuits into a small bowl and mix with ¼ cup of butter. This is to make the biscuit crumbs stick together so they don’t crumble. This makes for a better cheesecake base.


Step 3: Place a small amount into each cupcake liner and place in the tray. Then, using a spoon, press on the biscuit crumbs tightly and evenly into the tray so that the cheese filling can be poured on top. Then set it aside.


Step 4: Place 10.5 oz of block cream cheese in a big bowl then whisk using a mixer. Whisk until it is creamy. Make sure to use a low speed so you don’t overmix.


Step 5: Mix in ¼ cup of sugar little by little. This is done to get a better mixture.


Step 6: Next add in your eggs one at a time. Again, this is done in order to get a better mix. Mix until it is just combined.


Step 7: Using the measuring spoons to get the right amount, pour 1 teaspoon vanilla extract into the mixture. This will take the edge off the smell of raw eggs. Then pour 1 ½ tablespoon of all purpose flour. This will prevent cracks in the cheesecake cupcakes. Finally add 1 tablespoon lemon juice to give a hint of citrus that will balance flavor. Then mix just to combine.


Step 8: Add in 6.5 oz of sour cream and mix. The sour cream actually softens the texture of the cream cheese while adding a tangy flavor.


Step 9: After mixing, use an ice cream scoop to scoop the filling and place it onto every previously prepared base.


Step 10: Gently shake the cupcake tray. This will cause the filling to spread out more evenly and make the top surface flat.


Step 11: Bake for 15 minutes at 320℉ in an oven that has been preheated. Make sure that if it's not a conventional oven that it’s on conventional mode so that the temperature will be stable-low. This is done so that the cheesecake will not overbake and crack.


Step 12: Remove the cheesecake cupcakes from the oven and let them cool down to room temperature. Then place in the fridge. Cooling to room temperature will allow them to set completely. Putting the cheesecake cupcakes in the fridge while still hot can spoil them.


Step 13: Serve! You can serve them as they are or add some toppings. I recommend adding a little strawberry jam and your choice of berries.


After reading I hope that you will want to make these and enjoy them!

"How told Hold Different Styles of 4 Mallets" - By Nicolas A P


Marimba, Vibraphone and Xylophone are examples of mallet type percussion instruments used in a concert or orchestra setting but are also used for marching bands. They are large instruments that have the same layout as a piano but with big wooden keys for marimba and xylo keyboards or with metal keys for vibraphone keyboards. 4 mallets is a technique where you hold two mallets in one hand so players can play chords on the keyboard and generate large sound and create harmonies when played with multiple people. I will be explaining the ways one how to hole two different grips, Stevens grip which is the most common and the easiest and traditional grip which is a little more challenging but fun to use when playing chords.

Tools: Only tools you need are a pair of mallets to hold in one hand or two pairs to hold two mallets in each hand.

Stevens Grip

1)Place the bottom of the mallet in the center of your palm, this will become the foundation of where to put the 2nd, or outside mallet and is the base for where the 1st, or inside mallet is. There are many types of grip but this grip is called Steven’s grip.


2)Next relax your index finger and your thumb letting the mallet fall into the first indent on your index finger and just simply placing your thumb on top of the mallet to gain control of the mallet.


3) The last part is to add the outside mallet. This mallet will be placed in between your middle and ring finger and will be held by your ring and pinky finger. You want to make sure that there is not a lot of slack hanging off from the outside mallet or else it will cause insufficient playing and bad technique and could result in some pain from holding the mallet wrong and using the wrong muscles and result to injury (this has happened to me before it is not fun). You want to make sure there is only about a third of an inch of slack left and have it rest on the fatty part of your hand. After, place your middle finger on the inside mallet where it will hold it for more control and the result in a normal state should look like a pizza shape and that is how you know you are holding the mallets right. After that you are now holding the 4 mallet grip called Stevens grip. It is a good beginner technique and mainly used in west-coast type playing in the marching band aspect which is more flowy and has more use of the arm.


Traditional Grip

1) Place the mallets in a cross form on a table, bed, or on your keyboard. Simply just grab the mallets with your ring and pinky finger at the intersection of the mallets. Make sure the mallets  are still crossed or else the grip won’t work. 


2) The last thing is to place your middle finger on the outside mallet this time to control and make sure it doesn’t fly everywhere. Then place your index and thumb in the intersection of the mallets and hold it as if your fingers are making a “claw”. Traditional grip is one of the oldest types of grips and mainly used for east coast type marching style since it is better for playing octaves and playing loud and good for using the wrist “knocking” type of motion which is the normal technique for playing chords on the keyboard but west coast uses more arm while east coast uses more wrist and traditional grip is good for that. 


Last Step)

The last step for both of these techniques is to just practice practice practice. It takes a while to get used to these techniques and doesn’t happen right off the bat. Just make sure you hold the mallets with the right technique and you will eventually build muscles to hold heavier mallets. In the process of playing with these grips and with heavier mallets, you will start to blister in spots such as the center of your palm and your middle finger. Those are the normal spots to blister and it is normal and is just your hand building up calluses to build endurance holding mallets so your hands won’t get tired as fast. If you get blisters anywhere else such as the pinky, ring finger or thumb or feel sharp pain anywhere on your hand, you may want to look at how you are holding the mallets because those types of causes are from holding the mallets wrong, but if you continue practicing even just 15 minutes a day, you will eventually build the stamina in your hands and grow better as a player and play cool music on your own on either marimba, vibraphone, xylophone or any other mallet instrument.

"33 days" by Joshua A


33 days. There are 33 more days until we graduate. I remember in seventh grade we were doing an assignment that required us to fill in our graduate year. I remember thinking “2023, damn that’s a long time, I still have six more years until I graduate.” Now I have a little over a month left of school then I’m done. The fact that we are graduating soon didn’t really hit me until like 3 days ago when I was driving home from school. It’s a surreal feeling that we are gonna walk out of Etiwanda soon for the last time as students. We have AP tests in two weeks, one more student led discussion, and one more book to read. Then that's it, we’re grown. Soon, I'm going to walk into Mrs. Cogswell’s class late for the last time, sit down for one last bio lecture from Mrs. Aurora, and turn in my pre-calc homework for the last time. I remember my freshman year I was put into Computers, Career, and Finance as an elective. That class was mostly made up of seniors and juniors with only about 8 freshmen including myself. I made a lot of senior friends in that class which was really cool for me back then since they were so much older than me. I started to think to myself that soon I’ll have less than six periods, I’ll be driving myself to school, and I’ll also be suffering from senioritis, which I am. I got some great advice from them like how to carry myself throughout highschool and what the next three years would look like for me. I also got to experience how freshmen get toyed with a lot by seniors. At the beginning of second semester I sat next to this new kid who was a senior and he realized that I was a freshman. The first thing that he said to me was, “Bro you know what’s crazy, if I punch you right now that’s assault and I’ll go to jail”. Obviously I knew he was joking. I laughed and we ended up becoming great friends during that semester. The biggest piece of advice that my senior friends told me during that time was to enjoy every moment of high school, because it goes by fast. I think I can speak for everybody when I say we’ve all been hearing this for a long time whether it be from friends who graduate, social media, etc. I personally heard it a lot from my middle school teachers. But, if I had to be honest, high school did not go by fast for me. Don’t get me wrong, I loved high school. Even though it's a struggle getting out of bed early each morning and going to school, I wouldn’t trade my high school experience for anything. I had a lot of great memories in high school like all the dances I went to, the friends I made, the teachers I had, the conversations I had with my friends when we had work periods, etc. When this is all over very soon I know I’m going to miss it. But my high school experience didn’t go by fast for me. I don’t know if it’s because I was looking towards the end of the year throughout all four years of high school, or because all the times I stressed about my grades, or because all the times I had to work on assignments that were due in 2 hours because I was procrastinating (This blog). I don’t really think there’s an answer for it. Time keeps going, it doesn’t stop. Personally, I’ve been looking forward to graduation since freshman year and now that it’s just around the corner, I couldn’t be more excited. I cherished every memory I made in high school and will continue to do so as this year comes to a close. Looking back, I changed a lot from freshman year to now.  For starters I got some facial hair now, I don’t wear bright-neon outfits anymore, and I’ve grown more as a person. If I had to go back and give my freshman self advice about the next four years, I would tell him not to stress about the future and just enjoy the journey. We wrote letters to our future selves during sophomore year and should be getting them back during graduation so I’m looking forward to that. We’re now in the final stretch of our high school lives and we will very soon get handed a piece of paper and leave this place most likely forever. For many of us this will be a very joyous and emotional occasion. I’m proud and happy to say that I am a part of the class of 2023 at Etiwanda High School, and I wish all of you guys good luck on your future endeavors.