I’ve always loved eating cheesecake, but I was only ever able to eat it for special occasions because it is harder to make than a regular cake. My mom found the solution to this a few years ago when she discovered an easy recipe for cheesecake made to be the size of a cupcake. Ever since she learned this recipe she makes it when we have family gatherings, and she’s taught me how to make them too. These cheesecake cupcakes always bring me happy memories of spending time with my family, and I hope that you can enjoy this recipe as well!
To start off with, you will need to make sure you bake these the night before you want to eat them since they need to be refrigerated overnight. This recipe will make about 12 cheesecake cupcakes. Prep time will take about 20 minutes and bake time is 15 minutes.
To begin baking you need will need the following materials
● Whisk
● Spoon
● Mixer
● Ice cream scoop
● 2 bowls (a big and small one)
● Measuring cups and spoons
● Rolling pin or food processor
● Plastic bag (only for rolling pin)
● Cupcake tray (12 cup)
● Cupcake liners
All ingredients must be at room temperature in order to make mixing easier. For the two main parts to this recipe, the biscuit base and the cheese filling, the ingredients are the following
Biscuit Base Ingredients
● 1 ½ cup crushed biscuits
● ¼ cup unsalted butter
Cheese Filling Ingredients
● 10.5 oz full fat cream cheese
● ¼ cup granulated sugar
● 2 eggs
● 1 teaspoon vanilla extract
● 1 tablespoon lemon juice
● 1 ½ tablespoon all purpose flour
● ¾ cup full fat sour cream
*Following photos credited to El Mundo Eats Youtube channel/trustedreviews.com
Step 1: Place your choice of biscuits into a plastic bag, it will hold the crushed biscuits so it won’t make a mess. Using a rolling pin, crush the biscuits until it is a fine mixture. You can also just use a food processor if you have one!
Step 2: Place 1 ½ cup of the crushed biscuits into a small bowl and mix with ¼ cup of butter. This is to make the biscuit crumbs stick together so they don’t crumble. This makes for a better cheesecake base.
Step 3: Place a small amount into each cupcake liner and place in the tray. Then, using a spoon, press on the biscuit crumbs tightly and evenly into the tray so that the cheese filling can be poured on top. Then set it aside.
Step 4: Place 10.5 oz of block cream cheese in a big bowl then whisk using a mixer. Whisk until it is creamy. Make sure to use a low speed so you don’t overmix.
Step 5: Mix in ¼ cup of sugar little by little. This is done to get a better mixture.
Step 6: Next add in your eggs one at a time. Again, this is done in order to get a better mix. Mix until it is just combined.
Step 7: Using the measuring spoons to get the right amount, pour 1 teaspoon vanilla extract into the mixture. This will take the edge off the smell of raw eggs. Then pour 1 ½ tablespoon of all purpose flour. This will prevent cracks in the cheesecake cupcakes. Finally add 1 tablespoon lemon juice to give a hint of citrus that will balance flavor. Then mix just to combine.
Step 8: Add in 6.5 oz of sour cream and mix. The sour cream actually softens the texture of the cream cheese while adding a tangy flavor.
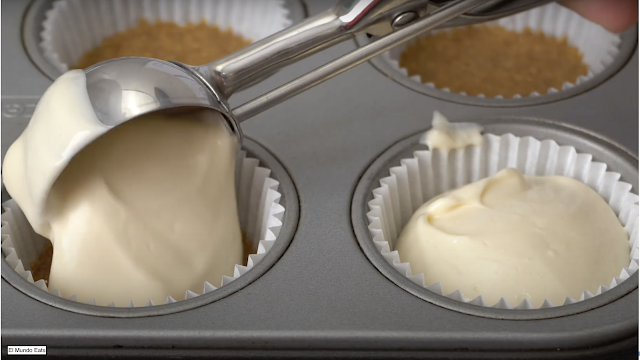
Step 9: After mixing, use an ice cream scoop to scoop the filling and place it onto every previously prepared base.
Step 10: Gently shake the cupcake tray. This will cause the filling to spread out more evenly and make the top surface flat.
Step 11: Bake for 15 minutes at 320℉ in an oven that has been preheated. Make sure that if it's not a conventional oven that it’s on conventional mode so that the temperature will be stable-low. This is done so that the cheesecake will not overbake and crack.
Step 12: Remove the cheesecake cupcakes from the oven and let them cool down to room temperature. Then place in the fridge. Cooling to room temperature will allow them to set completely. Putting the cheesecake cupcakes in the fridge while still hot can spoil them.
Step 13: Serve! You can serve them as they are or add some toppings. I recommend adding a little strawberry jam and your choice of berries.
After reading I hope that you will want to make these and enjoy them!


No comments:
Post a Comment