Pages

Tuesday, February 21, 2023

You'll love these!

 All Students:  Be sure to read the entries for this group --February writers).  Everyone is required to comment on at least THREE different pieces of writing.  You must submit comments on Canvas (for each one, include the name of the author and the title of their piece, and then your positive, specific comment ) by Wednesday, March 8 on Canvas.


Remember, comments must be positive, supportive, constructive, and SPECIFIC.  No "Good Job!" comments, unless you follow that with specific things you thought were done well in the piece.  Show them you actually took the time to read and enjoy their work!

" How to Make Puto (Filipino Rice Cakes)" by Bianca M


As a small child, I often watched my mother concoct one of my favorite desserts from her colorful kutsinta cups and a pot taller than I was. I would wait impatiently for this snack to cool down after it finished steaming. My impatience led to me usually burning my tongue so I could eat these Filipino rice cakes, otherwise known as puto.


Although “puto” is a very offensive insult in Spanish, it is one of the most popular snacks in the Philippines. It is a simple rice cake, sometimes topped with cheese, and served at many family gatherings and boodle fights. You can pair it with savory Filipino dishes, such as dinuguan, or enjoy it as it is. Puto is one of the most integral (or derivative?) parts of my life as a Filipino-American, which is why I am sharing my mother’s recipe (with her consent) with you guys. :D


Materials:

-       Kutsinta cups: I know many of you do not have these kinds of cups, so you can use cupcake paper cups, food-grade silicone molds, banana leaves, etc., as long as you have something to hold your batter while it is in the pot.

-       The number of puto you can make depends on the size of your molds.


-       Steamer or cooking pot


-       Some love if you can spare some :)


Ingredients:

I’m not aware of the puto yield for this recipe, so adjust accordingly. :D

If you cannot find these at your grocery store, go to 99 Ranch, Seafood City, or other Asian stores.

Dry

-       2 cups of non-glutinous rice flour

-       All-purpose flour works, but it won’t be a rice cake.

-       ½ teaspoon of salt

-       1 cup of white sugar

-       3 teaspoons of baking powder

Wet

-       2 cups of coconut milk

-       2 tablespoons of melted butter

-       1 egg

Instructions:


Step 1: Pour 3-5 cups of water into your steamer pot.


Step 2: Put all of your dry ingredients in a large bowl. The order doesn’t matter but mixing well does. Mix well.


Step 3: Put the coconut milk, butter, and eggs in a separate bowl. Mix well.


Step 4: After mixing your wet ingredients, pour them into the bowl with your dry ingredients. Mix at a moderate speed so that air bubbles do not form. Also, mix until there are no lumps; otherwise, your puto will look and taste weird. The batter should look smooth.


Step 5: Spread butter inside your kutsinta cups so that your puto doesn’t stick. Pour the batter into your kutsinta cups. Each cup should be about ¾ full of batter. To make your life easier, you can use a spoon or a measuring cup to help.


Step 6: Place your kutsinta cups into your steamer pot. You can also add a cheese topping if you wish.


Step 7: Set the stove on low heat. It will ensure the perfect dome of the puto since the batter will rise nicely due to the low heat. Steam for 20 - 30 minutes or until a toothpick is inserted and comes out clean. It is recommended that you wrap a cotton fabric on the lid so that the water doesn’t drip onto the puto.


Step 8: Gently remove the puto from its mold with the help of a spatula or use CLEAN hands. (If you don’t wash your hands…extra spice, I guess.)


Step 9: You can stack them on a plate or eat them while you remove the other puto from their molds. 


Step 10: Enjoy! This step is crucial.


"How to Drive Stick Shift!" by Caleb V


            From my earliest years, I always remember the time I spent with my dad, working on or driving cars. Growing up, my dad shared his passion and knowledge about cars with me. This has caused me to grow my own passion and love for cars. We spent hours together in the garage working on his mustang. When I was young, I would stand there holding the flashlight for my dad. He would take time to describe all the parts and all of their different functions. As the years went on, I expanded my knowledge about cars, and eventually would start being able to help him work on the cars. The one thing I always wanted to learn about was how to drive manual, or stick shift. I always saw my dad driving, how he shifted gears, and would always be in amazement. I’ll never forget the first time my dad let me try driving stick, it was one of the best day’s with him. Driving stick is an entirely different feeling of driving, it involves using your whole body to operate the car. In this tutorial, I hope to explain what a manual transmission is and how to be able to drive a manual car. Learning and being able to drive stick has been one of my favorite memories with my dad, and I hope to share that with all of you.


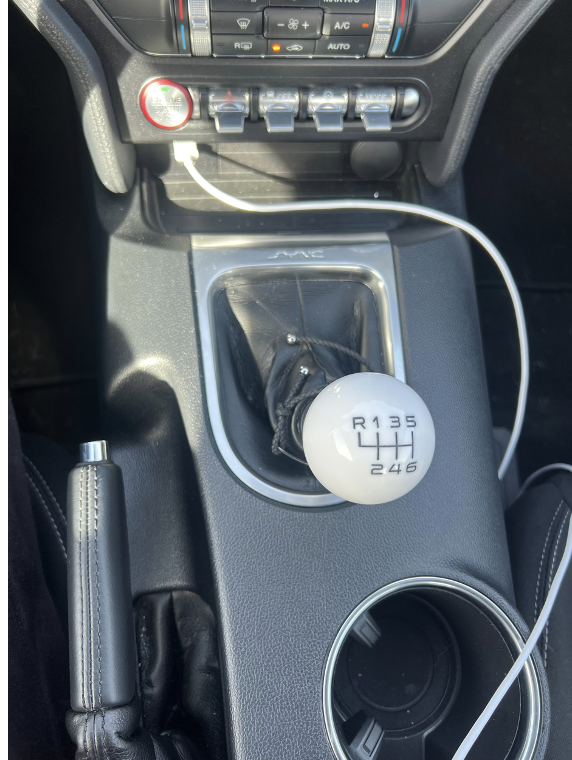
Step 1: Understanding what a manual transmission is:

All cars have a transmission, it is what shifts the gears in your car. In technical terms, most cars have 6 gears, which you shift throughout as you're driving. Using a tachometer, you either shift yourself, or your automatic transmission (most cars) shift it for you. Essentially, when you're driving and you hear your engine sound loud, that means high RPMs. The break from the engine being loud to being quiet, that is when your transmission has shifted gears. A manual transmission just means you yourself are shifting your gears, allowing for more control over the car. In order to shift a manual transmission, you must engage the clutch, while letting off the gas, and moving the shifter to the next gear. The clutch is the 1st pedal on the left, or to the left of the brake.


Step 2: 1st gear, the tachometer, and the clutch

In a manual car, when stopped you either must be in 1st gear with the clutch engaged, or neutral. If you don’t then the engine will stall, turning the car off. Additionally, on hills, you will roll back if you don’t engage the clutch fast enough to start counteracting the force pulling you back.


Now, to get out of first gear, you must release the clutch to an engagement point. The engagement point is where you slowly lift up on the clutch, and you begin to feel the car start moving. At that point, you need to simultaneously let off the clutch while giving the car gas. If you do that, without flooring the gas, you can get out of first gear! You use the tachometer to know when to shift, at about 2500, RPMs, or eventually you can listen to engine noise to know when. From this gear, you will upshift to 2nd.


 Step 3: 2nd, the turning gear            


2nd gear is a short gear, meaning you won’t be in for a very long time. It is the gear that you will always turn in, so when taking a turn, you would downshift into second gear. From this gear you will upshift to 3rd.


Step 4: 3rd gear

3rd gear is longer than 2nd, but another gear that you will not be in for a long time. It is possible to take a turn in third gear if you are going fast enough, but you normally would not. From this gear you will upshift to 4th.


Step 5: 4th gear  

4th gear is a long gear, which makes it good for street driving. The gear is used at about 40mph so for most streets, you can just stay in this gear as you are driving. From this gear you will upshift to 5th. When shifting from third, you move the shifter straight down. You have to be careful when doing so to make sure that you do not accidentally shift into 2nd gear.


Step 6: 5th gear

5th gear can be used both on the freeway and on the street. It is good at about 50 mph and up to 60 mph. On the freeway, you want your RPMs to be at 2,000. If they are below that, you need to downshift because lugging can damage the engine. If the RPMs are way too high, then you need to upshift. For shifting into 5th, when learning you should push the shifter with an up then right motion. You will feel a wall, basically as far right as you can push the shifter. Once you feel that, go straight up to 5th to ensure you enter 5th gear.


Step 7: 6th gear

In my car, and in most manual cars, it will be a 6 speed transmission. Meaning that there will only be 6 gears to be in. To be in 6th gear, you have to be going at about 65 mph and faster. So, you will usually only be in this gear when you are on the freeway. If you have made it into 6th gear, congratulations! You've now shifted through all 6 gears. Like with most things, with practice and more experience, you will only get better. Have fun driving stick shift!


"Help!" (Bonus Material!) by Bianca M


"Unconventional Heartbreak" by Zhoe C


Taekwondo broke my heart. Unlike most people, my first love wasn’t a person, but a sport. When I was seven years old, I was walking around my local shopping center with my parents after we had just eaten lunch. We walked by this taekwondo studio and I caught a glance of kids kicking these funny looking kicking bags that looked like angry men while yelling as loud as they could. It sounds like such an obscure and silly scene, but I was hooked from that moment on. I was stuck in awe, staring through the window when the instructor came out to welcome me into the new world of taekwondo that soon became my home. My mom, who tried and tried to get me into ballet, was immediately against it but my father who did every martial art there is to offer was excited and signed me up right then and there. For the first few years I worked my way up to becoming a black belt and solely did the sport for fun. That all changed when I joined the competition team.

I always hated sparring ever since a blue belt three times my size beat my little orange belt self scared straight. But, since I was curious I decided to give it a shot and I fell in love with competing. Competing became my entire life. I developed goals and a new passion for taekwondo I didn’t even know I had. I wanted to be the best and I wanted to make it to the Olympics. I devoted seven days a week, three to five hours a day to training. I started off slow. Of course as a newby I never really got far in tournaments, but my desire to win gold only grew. With time, I started winning the smaller tournaments and it began time to start competing in the bigger, more rewarding tournaments, but with that came cutting weight.

I’ve been cutting weight since 7th grade and it is by far the aspect that was the most taxing on me mentally and physically. The weight I needed to lose started off small with one to two pounds, then it got to five, then to ten and before I knew it I had to lose 18 pounds.I dreaded losing the weight every single time. Sitting at lunch watching my friends eat without a care seems like such a small issue but would cause mental breakdowns when I got home.It wasn’t always this bad. I started cutting weight in a healthy way. I felt good, healthy, and lean. But when I hit a plateau, I would start to panic. With the panic came the starvation. I began to only eat less than 200 calories a day. After every single bite of anything I ate, I would run upstairs to weigh myself to make sure I didn’t even gain an ounce. Whenever I was forced by my parents or coaches to eat more, I would start panicking even more and convince myself I just lost all my progress. I singular strawberry or taking four bites of my food instead of three would cause me to spiral. I would do this all to the day of weigh-ins and once I made weight, came the binging. I couldn’t stop. Any food I was offered or had the chance to eat I would eat because in just the next week, I wouldn’t be able to eat again. I developed this unhealthy relationship with food that still affects me when I’m not cutting weight. With tournaments even three months apart, I’m only thinking of how much I weigh or how much I’m gaining with every meal. It’s a constant, nagging voice in my head that overwhelms me with guilt that takes months to get rid of but once it's gone, it comes right back when another tournament is announced.

On top of battling myself internally, I was battling the taekwondo organization itself. I was gaining opportunity upon opportunity but with sports comes politics and of course I was not one of the favorites, so they took all my opportunities away. I made the USA Team, was set to go to the Pan Am Games, and even worlds, but with everyone against me and the peak of covid, my passion started to die out. I faced back to back to back injuries on top of everything else and I no longer had that desire to win. It felt like the world was against me so I started thinking “why try?”.

I spent the last two years searching for that passion again and all I got were glimpses of what I used to feel. So after 11 years of giving everything I've got for the sport, I've decided to take a break from competing. Like any romantic relationship that could be great and beautiful, I unfortunately developed a toxic one with the sport I used to love. This sport has been my outlet to the harshness of life and was always my comfort place. It was the sport that introduced me to lifelong friends and great mentors who I go to for everything now, even topics not related to taekwondo. After I made that decision, I felt this overwhelming feeling of heartbreak. Even just being in the studio again hurt. It hurts to be surrounded by the success that was once taken away from me. I'm not sure where I'll be going with this sport but I will always appreciate what it has done for me. It took me a long time, but I’ve finally accepted that it’s ok to take a break from the thing that you love and take a break from the heartbreak to find yourself again. Many may not comprehend how an extracurricular activity can have such a serious effect on a person but it can and taekwondo did just that. Taekwondo gave me hope and passion. Taekwondo gave me life. Taekwondo gave me purpose. Taekwondo broke my heart.

"How To: Properly do a Drumroll" by Daniel J


Drumming is not something that just anyone does daily, but there is a whole world of technique and finesse that people are unaware about. Even with something as baseline as a drumroll, there is an impressive amount of concepts that go into just one rudiment. I am going to show how the roll works and what you need to do to produce the roll.


TOOLS:There are not many actual tools that would be needed to learn and practice how to do a drumroll but you would need drumsticks and if possible a drum pad. But, basically any hard surface (i.e. floor, table, counter, etc) would work.


STEP 1: get into a comfortable position and surrounding and if a possible, get into a quiet area so you can hear what is actually being played. Being in a quiet environment allows you to be more in tune with your own thoughts and how you feel which will transfer to your instrument, in this case the drum sticks.


STEP 2:HOLDING THE STICK

-Starting off with the most simple concept, how to hold the stick. There are many different styles of holding a drumstick but I have found having a three point fulcrum be the most efficient way to play. About six inches from the bottom of the stick is where you should plant the meaty part of your thumb. You are the going to want to create a triangle shape with your middle finger and index finger in correlation with your thumb. After that you want to just let the rest of your fingers relax and stay placed on the stick. But, you do not want your back fingers to come off of the stick. You will really want to make sure your grip is correct throughout everything you play.


STEP 3: HOW TO RELAX

-While playing, if your muscles are not used to the sensations of drumming, when playing something fast like a roll, it is really common to start to tense up and “death grip” the stick and flex the muscles in your arm. Focusing on your breathing while drumming is the most effective way to keep your muscles relaxed. Relaxation also allows you to produce the best sound quality. Squeezing the stick cuts off the sticks natural vibration and just makes it harder to play faster. When holding the stick, your grip should be relaxed enough to the point that someone can walk out and easily take the stick out of your hand but not loose enough where the stick going to fly out of your hand.


STEP 4: PLAYING THE CHECK RHYTHM

-With a roll, there is an underlying rhythm that dictates your hand speed. For example, If you wanted to play a 16th note roll, without the “diddles” your hands are playing a 8th note check rhythm. The roll will sound like there are 16 notes a beat, but your hands are moving at the speed they would while playing 8th notes. Same type of concept applies to triplet rolls. Your hands move at the speed of a triplet but it will sound like sixtuplets every beat.


STEP 5: UNDERSTANDING AND PLAYING A DIDDLE

-A diddle is drumming language for a double or two notes played on one hand. For example, two left hits and two right hits. To produce a diddle you will want to try to use your wrist to get each individual note but at faster tempos that is just not possible. So, you will want to find the right pressure your hand puts on the stick to get two notes out. To find this pressure you are going to squeeze a little and press the stick straight into the surface you are playing on and try to cut the sound off as quick as possible. Next, you will want to slowly start to release the pressure until when you push the stick into the surface, two distinct notes come out. Remember you are going to want to keep all fingers on the stick. The diddle will sound weak at first but you will want to give as much support with your back fingers(shown below) to make both notes sound the same.


STEP 6: BUILDING UP

-You want to make sure your the stick has as much room to “breath” while being controlled. Whe producing the diddle, to make it as strong as possible you can practice on a surface that would absorb all impact. LIke a pillow or a mattress. Doing so will help build the muscles needed to make both notes sound the exact same. When you add the diddle it should sound like the rhythm you are playing has doubled in notes. This is what I would do to really improve my roll quality and build my “chops”. I did this daily so no matter what complex rudiments or hybrid rudiments I played would be as high of quality as possible.


STEP 7: MOST IMPORTANT STEP

-Practice daily. Practicing anything drumming related, will strengthen your hands as a drummer and make you a better overall player.